Monday, October 31, 2011

Revlon Blue Lagoon Gradient

This is my first time trying a gradient of colors on one nail, and I think I could use some practice making it look more blended, but I still like it. :)


I started this by putting on two coats of Revlon Blue Lagoon. I added a coat of Seche Vite before I sponged on my other colors, so that it would dry faster.

Revlon Blue Lagoon

To sponge on the colors, I used a makeup sponge and actually cut it in half so that the width would be closer to the size of my nail. I made less of a mess on my skin this way and I used a new sponge for each color.


I put some polish down on my palette and dipped my sponge into it, dabbing it until there was a pretty even amount on the sponge. Then I started to dab it onto my nail, and I took the color about 3/4 of the way down with my first color - not going as far down for each of the following colors. The following pictures are in the order that I applied the colors, and the polish I used under each picture.

Ulta Bam-Blue-Zled

Zoya Crystal

Jesse's Girl Glee

Sinful Colors Midnight Blue

To smooth everything out, I added a coat of Seche Vite. Thanks for looking!


Saturday, October 29, 2011

Last Halloween for 2011!

So - I wanted to save the best Halloween mani for last! I finally had some down time this weekend from school work, so I had the time to do this one. I was originally inspired to do this by Cosmetic Cupcake, who did a cute Halloween mani here, but I wanted to switch it up and do some different things.


To do this mani:

Thumb - Two coats of China Glaze Near Dark, a deep green from their Haunting Halloween collection for 2011. I used my white Two-Way Nail Art Pen and Brush, and used the brush side to create the stripes, and the pen side to do the swoops in between each line.

Index - One coat of Tropez Valentine. One coat of Nubar 2010. Then I used different sized dotting tools with Sally Hansen Black Out to create the spider and web. I added the legs using my It's So Easy, Stripe Rite nail art striper in black. I used the pen side of my Two-Way Nail Art Pen and Brush and added the eyes of my spider.

Middle - Two coats of Ulta Love My Blackberry. I painted white circles using Sally Hansen White On, then added a dot of In The Lime Light, then inside that a dot of Sally Hansen Black Out. To create the shine spots I used the pen side of my white Two-Way Nail Art Pen and Brush. For the veins I used my It's So Easy, Stripe Rite nail art striper in red. I saw this idea on Flickr here.

Ring Finger - Two coats of Sinful Colors Mint Apple. To do his hair I used Sinful Colors Secret Admirer, and I used this for the black of the eyes with my dotting tool. The whites of his eyes are Sally Hansen White On using a dotting tool. For his mouth I used my It's So Easy, Stripe Rite nail art striper in black. I have seen lots of cute Frankenstein's out there... but this particular one was inspired specifically from Cosmetic Cupcake's design I linked above.

Pinky - Two coats of Ulta Sun-Sational. I used my It's So Easy, Stripe Rite nail art striper in black to create the little trees and grave stone. I saw this idea on Flickr here. I should have drawn this the other way so it wasn't facing the opposite way of my spider and Frankenstein. oh well :)

Every design has a coat of Seche Vite Dry Fast Top Coat on it.


Thursday, October 27, 2011

Spring Design for Fall?!

So - I wanted to change my polish, but I didn't have time to spend to do the next Halloween idea I had in mind. I reached into my polish and decided on these two colors... which is so anti-Fall! I think maybe I am fighting this oncoming cold weather in my own way with this mani :)


To do this mani:

Index, middle and pinky - Two coats of Orly Flirty.
Thumb and ring finger - Two coats of China Glaze Peachy Keen with a line of fuschia rhinestones I bought on ebay.

Orly Flirty is such a pretty color and honestly I think I could have gotten away with one coat. I put Seche Vite on top of every finger, so you can't see the cool, partially matte finish this normally has. I will need to swatch this sometime. It also photographed a bit lighter, and leans a little more purple in person. It matches my rhinestones fairly well. Peachy Keen also photographed a little lighter than it is in person. It reminds me of a creamsicle in these pictures, and in person it has a bit more orange in it. Such a pretty creamy color, though - I really love it.

Milani Bare to Wear

This is Milani Bare to Wear, and I saw a swatch of this on Rachel Marie's blog, and I wanted to have it for myself! I thought the formula on this was a bit watery, and it had a tendency to want to puddle into my cuticle. In these pictures I only used two coats, but it probably could have used three because I had a few bald spots on the nail. I think it's a really pretty color though, and I don't have anything like this in my collection.

 Indoor - no flash

Indoor - no flash

Indoor - with flash

I think the first two pictures (without flash) show what this looks like in person, the last picture makes the polish seem a little... purple maybe? It doesn't feel purple to me though. Also, sorry about the smudge on my pinky - my ring finger decided to get a bit close when I wanted to take pictures! :)

Wednesday, October 26, 2011

Halloween-ish Gradient Shatter Fail!

So - I thought an easy Halloween idea would be to try an orange gradient, and throw some black shatter on top of it. FAIL. It didn't turn out as well as I would have liked... perhaps I should not start painting my nails at 10:30 at night with bad lighting! :-D Oh, and I am pretty sure the colors on my middle finger and ring finger should have been switched around. Plus, in person my thumb and index look like the same color, and so do my middle, ring, and pinky! I guess I just don't have a large enough variety of orange polish to do a decent gradient. Well, here is my fail... enjoy!


Yikes - I can see five places where my polish managed to make it on to my skin. Seriously, I have to do my nails when I am more awake. :) To do this mani I used:

Thumb - Two coats of Finger Paints Cordur-Orange.

Index - Two coats of Sally Hansen Crushed

Middle - Two coats of Revlon Tangerine

Ring - Two coats of Maybelline Colorama Orange Pop

Pinky - Two coats of China Glaze Sun Worshiper

I added one coat of OPI Black Shatter when my nails were nearly dry, and then I added Orly Won't Chip top coat. I have heard that Seche Vite doesn't play well with crackle, and can try and pull it away from the tips, so that's why I used my Orly top coat. I miss how smooth Seche Vite makes my nails feel though. *sigh* I love my SV.

This is before I added the top coat

Sunday, October 23, 2011

White Party Nails

I had to take a break from Halloween nails because my boyfriend's sister had an AMAZING 40th birthday bash this weekend - and it was a white party.  I had silver, grey and black accessories, so I did this mani to go with my outfit. It was inspired by Cosmetic Cupcake, again! She is so creative :-D


To do this mani I used:

Index -Two coats of Revlon Matte Suede in Powder Puff, one coat of China Glaze Fairy Dust, and then I used my Kiss Nail Art Striper in Grey to make vertical lines down the nail.

Middle - Two coats of Color Club Worth the Risque. I stamped the fishnet design using Color Club Revvvolution stamped from Konad plate M57.

Ring - One coat of OPI Your Royal Shine-ness, with two coats of Milani Jewel FX in Silver.

Pinky - Two coats of Sally Hansen Wet Cement, with one coat of Nubar 2010. I added little sprigs using my It's So Easy, Stripe Rite nail art striper in black, and then I added a clear square rhinestone.

Thumb - Two coats of OPI Your Royal Shine-ness, with one coat of Nubar 2010. I stamped the flower design with Color Club Revvvolution from Konad plate M57. I also added another square rhinestone. The stamp doesn't show up very dark in these pictures, but it was a much stronger contrast in person.

Everything has Seche Vite topcoat on it. I think this turned out really cute, and I received lots of compliments on it which is always fun!

Look at that shine :)


I had to do a close up of the beautiful holographic polish ... love!

Thanks for looking!

Monday, October 17, 2011

Slimed!

I was trying to think of some new Halloween ideas, and I saw this cute and easy idea here.

To do this mani, I started with two coats of China Glaze In The Lime Light (Neon).

Indoor - No Flash

Indoor - With Flash

I really like this color, it has a really nice subtle shimmer in it and it also doesn't dry as matte as most neons do. My camera wouldn't quite pick up the true color of this polish, it was somewhere between the two pictures above - not quite as bright as the flash, but brighter than the picture without the flash. Also, I apologize for my polish bottle... it's had a rough life!

To create the drips, I used Sally Hansen Black Out and used the polish brush to create the drips and dots. I just painted on a messy french tip and wiggled my brush as I dragged it down my nail in various lengths and then added one or two dots. It didn't take very long, and it was nice because you don't have to worry about keeping a steady hand because you want the lines to be a bit messy. I added a coat of Seche Vite top coat to seal in the design.


Sunday, October 16, 2011

Blood Splatter

It's time to do some Halloween mani's for the next few weeks!


To do this I started with two coats of Sally Hansen White On.


Then, for the nails that I wanted to make a splatter on, I used Scotch tape to tape around my skin - for easier clean up.


To create the splatter I used a drinking straw and dipped the end into Finger Paints Gogh Red! and blew a puff of air out to make it splatter on the nail.


Then I used nail tattoos that I ordered on Ebay for my ring finger and thumb. I think I needed some practice with those because I got some air bubbles caught underneath. I put Seche Vite on top of everything.


Halloween and Flakies!

Here's my first Halloween mani for the season.


To do this one, on my index, middle and pinky I used two coats of Sally Hansen Black Out, and one coat of Nubar 2010. On my thumb and ring finger I used two coats of Ulta Deep Desire and one coat of Nubar 2010. I added some decals on my thumb that I got from Sally's and on my ring finger the decals came from Rite Aid. I topped everything with a coat of Seche Vite.

This flash in this picture makes Deep Desire look much brighter than it is, it is actually much closer to the first picture.

In the rest of these pictures I am trying to show how beautiful Nubar 2010 is, it is my first flakie nail polish and I don't think anything else could compare! It flashes orange, gold and green...just depending on the angle you are looking at it.


Nail Art

I wanted to go through more of my nail pictures and add them to my blog. Here it goes....

 I did this one for my cousin's wedding, and the necklace in this picture is the one I wore with my dress. This is two coats of Rimmel London Bare Naked, then I used my It's So Easy, Stripe Rite nail art striper in Gold and painted lines down my nails, then in between each line I used my It's So Easy, Stripe Rite nail art striper in clear glitter. Seche Vite on top.

I saw this design again on the Pretty Project Tumblr, which was originally posted from here. This is two coats of China Glaze For Audrey, then I used my dotting tool and put dots first using Sally Hansen White On, then Revlon Minted, and finally Ulta Taupe on a Rope. Seche Vite on top.


I saw this idea on Cosmetic Cupcake, I used some different colors. I started with two coats of Rimmel London Bare Naked, then put a thick stripe of Sinful Colors Soul Mate in varying areas on my nails. On top I added plaid lines using Color Club Art Club nail art brush in White. Seche Vite on top.
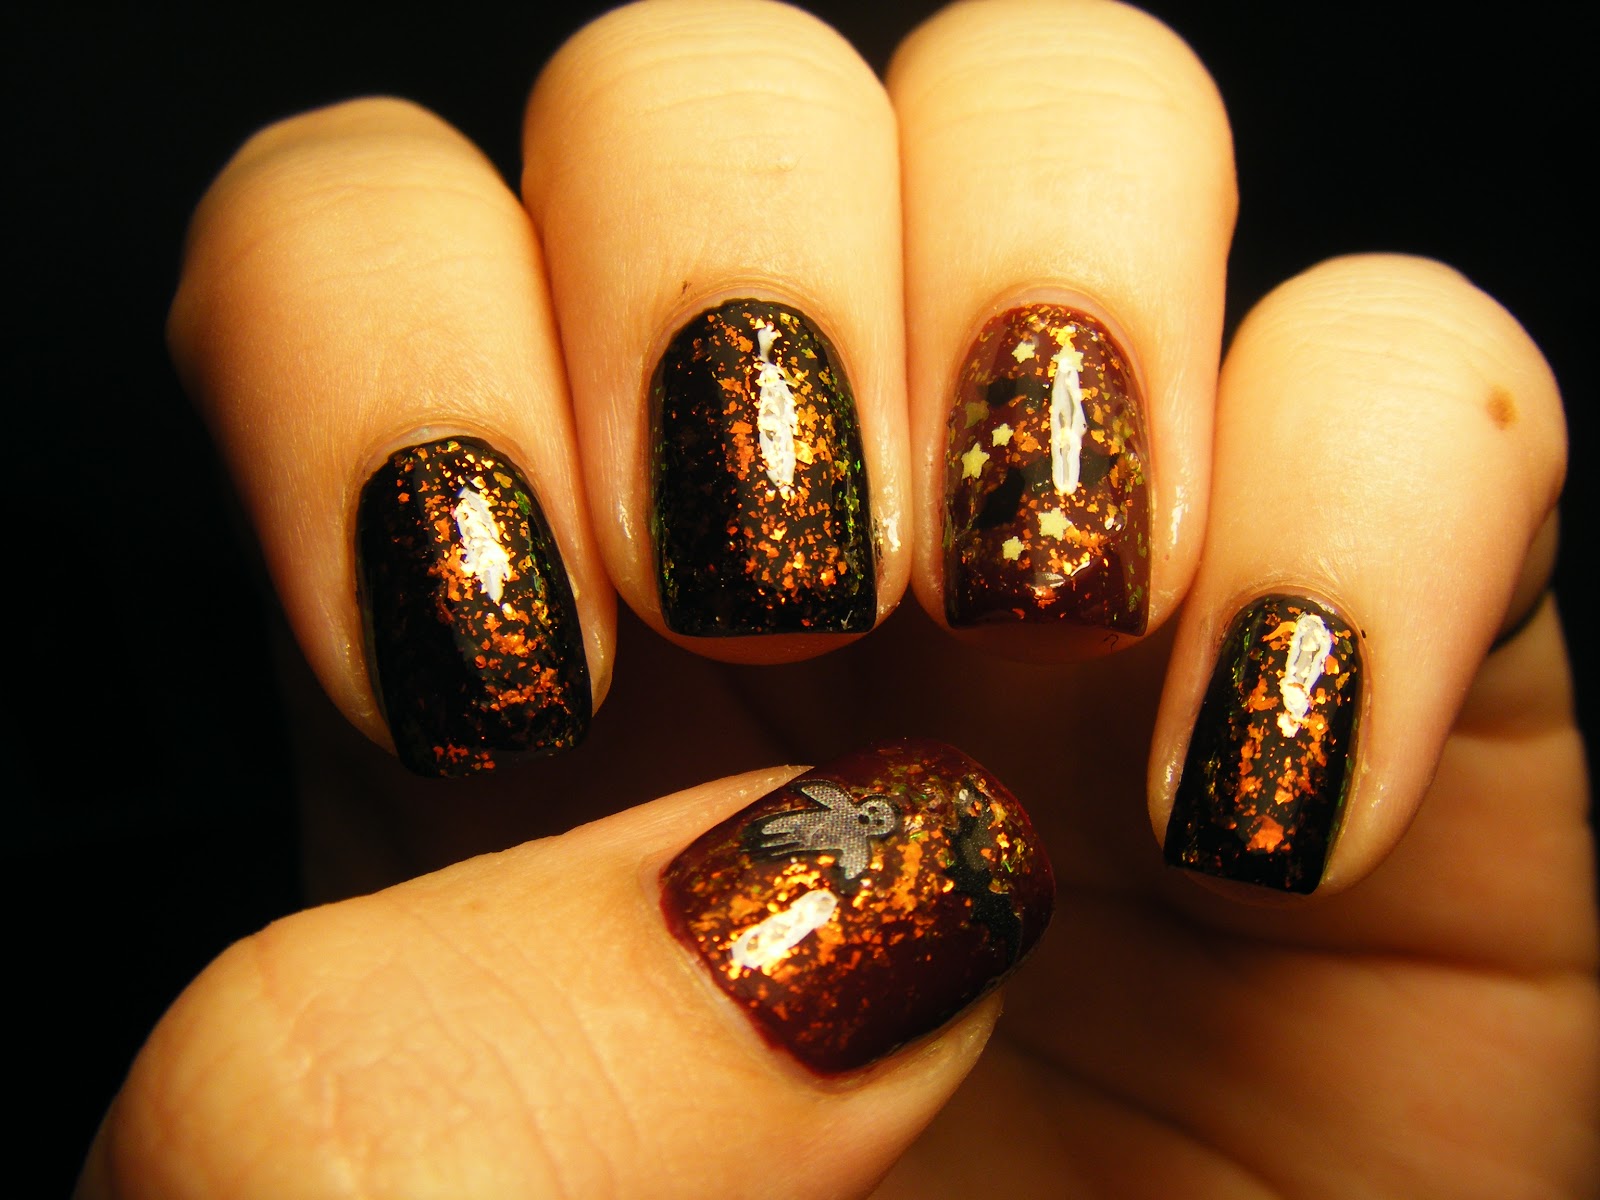

I saw this idea on Youtube, where Cutepolish offers a great tutorial. First I put down two coats of Sally Hansen White On, then after it dried I dipped my nails into rubbing alcohol, then pressed a piece newspaper down onto the nail and the newsprint transferred. I sealed it in with a coat of Seche Vite.

This is two coats of Finger Paints Artist's Inspiration. I added a few stripes starting with It's So Easy, Stripe Rite nail art striper in White, Black, Yellow and Sinful Colors Nail Art in Sunset. Seche Vite on top.

 I saw this idea on Chloe's Nails, she does amazing Scotch tape manis. I did this by painting my nails first with Sally Hansen Black Out, then put a coat of Seche Vite to help it dry. When it wasn't tacky anymore I used craft scissors that I bought at Wal-Mart and cut Scotch tape with them. I put the tape down on half my nail and painted the bare area with Sally Hansen Wet Cement, and pulled off the tape immediately after painting. I repeated this for each nail and then added Seche Vite on top to smooth things over.

This is two coats of Butter London Wallis, then on my ring finger I used strips of Scotch tape to create a little design with Color Club Revvvolution. Again, I saw this technique on Chloe's Nails blog. Seche Vite on top.

This is two coats of Finger Paints Catwalk Queen. I taped off the skin around my nail using Scotch tape and then used a straw and Ulta Deep Desire to create the splatter design. I dipped the end of the straw in Deep Desire then placed it over my nail and blew into the other end of the straw. Seche Vite on top.

This was inspired by Cosmetic Cupcake because she does amazing nail art and has every nail something different, in the same color scheme. I did this one to go with a dress for my friend's bachelorette party!
  • Thumb - Two coats of Finger Paints Catwalk Queen, then I used my dotting tool to create cheetah print using Sally Hansen Black Out, and accented it with Finger Paints Figure of Art.
  • Index Finger - Two coats of Rimmel London Bare Naked, then I used my It's So Easy, Stripe Rite nail art striper in Gold and painted lines down my nails, then in between each line I used my It's So Easy, Stripe Rite nail art striper in clear glitter.
  • Middle Finger - Two coats of Ulta High Roller, then I used my It's So Easy, Stripe Rite nail art striper in Black to create some zebra-ish stripes.
  • Ring Finger - One coat of Ulta High Roller, then two coats of Milani Jewel FX in Gold.
  • Pinky - Two coats of Sinful Colors Stella, one coat of Sinful Colors All About You, then I painted little sprigs using my It's So Easy, Stripe Rite nail art striper in Black. I added a gold rhinestone on top. Seche Vite on top of every finger.

Two coats of Orly Love Each Other. Hand painted tips with Sally Hansen White On, added red lines under the tips using then I used my It's So Easy, Stripe Rite nail art striper in Red, then added some zebra stripes using Color Club Art Club nail polish in Glitter Black. Seche Vite on top.

This was for my friend's wedding that I was in, I did this for the rest of the bridesmaids. Her colors were dark brown (like the tip) and light blue and she helped me come up with this design! This is two coats of Finger Paints Artist's Inspiration followed with a coat of China Glaze Crackle Glaze in Cracked Medallion. I hand painted the tips using Sinful Colors Rich in Heart and painted lines underneath using Color Club Art Club nail art striper in Light Blue. I added some nail art stuff I got at Sally Beauty and then put Seche Vite on top.

Index, middle and pinky is two coats of Color Club Wild at Heart. Thumb and ring finger is two coats of Revlon Facets of Fuschia.


Two coats of Ulta Tutu Cute, one coat of China Glaze Fairy Dust. I put some nail art stuff from Sally Beauty on my ring finger. Fairy Dust is an amazing holographic top coat.


Two coats of Borghese Rapido Limoncello with one coat of OPI Turquoise Shatter. Seche Vite on top.

Two coats of OPI Your Royal Shine-ness with Servin' Up Sparkle on top, then OPI Turquoise Shatter. Seche Vite on top.