Friday, November 30, 2012

OPI Don't Pretzel My Buttons and Essence Gorgeous Bling Bling

Today I have a simple mani for you, I tried doing accent nails on my index and middle finger this time, can't figure out if I like it or not!


On my index and middle finger are two coats of Essence Gorgeous Bling Bling, and on my ring, pinky and thumb is two coats of OPI Don't Pretzel My Buttons all with Seche Vite on top. These are both really lovely colors. I only wore this for 1 day, but I felt like I was staring at my nails the entire time. Don't Pretzel My Buttons is a beautiful creamy nude, and I loved it against my skin tone. The application was really nice and even, perfect in two coats! Gorgeous Bling Bling (what a name - lol!) is another really pretty color. It's a burnt orange packed with flakies. It's a really nice fall color. This one went on really nicely too.


PS - Don't forget to enter my giveaway to win a bottle of Nail-Venturous Floam! It's open until December 6th!

Wednesday, November 28, 2012

On Wednesday's We Wear Pink - Orly Flirty Spun Sugar Mani

Hi there! I have been wanting to get involved in a challenge for a while now, and I decided a fun/easy one for me to try out would be On Wednesday's We Wear Pink. If you have ever seen the movie Mean Girls, it's a really cute/funny scene in the movie. To be included in this challenge I added the picture to the side of my blog, and on Wednesday's ... you guessed it... we wear pink! It doesn't have to be every Wednesday, but I thought it would be a great way for me to get through my numerous pink polishes and gradually become involved in challenges.


Okay, so on to the design. I've seen this called a "spun sugar" design in the blog world, and I have been wanting to try this design for a while (here is a great YouTube tutorial to show this technique). Two amazing examples of this are by Chalkboard Nails and Manicurator. To do this, you basically just drop some polish onto a paper plate and as the polish begins to dry and get tacky and stringy, you dip a dotting tool (or something similar), into the polish and the stringy polish that hangs from it gets laid across your nail. It sounds easy, but I struggled with it... it seems like the polish I was using was taking SO long to get tacky. I may be better off finding some older polishes if I try this again.


For this mani I started with two coats of OPI My Boyfriend Scales Walls, and the strings are Orly Flirty. The above two photos are without topcoat. I love the dimension of this design, 3D nail art! But, I knew from when I started that I was going to have to put top coat on this bad boy, or it would never dry! So, below are the unfortunate after shots with Seche Vite on top. It just, doesn't look as cool to me...  the pink got all smeary looking and it just ended up looking messy to me. I still got a few compliments on it, and at a distance I guess I don't mind it, just not sure if I'll be trying this technique again. Which way do you prefer, with or without topcoat?


PS - Don't forget to enter my giveaway to win a bottle of Nail-Venturous Floam! It's open until December 6th!

Sunday, November 25, 2012

Zoya Gilty over Sinful Colors Last Chance

Today I have Zoya Gilty to share with you! I couldn't resist this limited edition 18k gold polish! It was a bit of a splurge, but I have wanted a gold top coat for a long time!
 

To do this mani I started with two coats of Sinful Colors Last Chance, a deep green.

 
Then I added one coat of Zoya Gilty. It wasn't as packed with gold leaf as I had hoped, so this coat is a bit on the thick side. It may have been easier to work with if I had done two thinner coats. Either way, it's a beautiful polish and I can't wait to try it over some other colors!


PS - Don't forget to enter my giveaway to win a bottle of Nail-Venturous Floam! It's open until December 6th!

Friday, November 23, 2012

Thanksgiving Dotticure

I know I'm a day late, but Happy Thanksgiving to those who celebrated it! Today I wanted to share my Thanksgiving mani. I just went with some Thanksgiving / fall colors.


To do this mani I started with two coats of China Glaze Desert Sun, with a coat of Seche Vite on top. This one is from the fall 2012 On Safari Collection by China Glaze. It applied really nicely, but I needed both coats. I really enjoy this color, it reminds me of a creamy caramel, yum!

 
After letting it dry a bit, I used a medium sized dotting tool and added dots of China Glaze Exotic Encounters (teal), Finger Paints Catwalk Queen (yellow) and Finger Paints Cordur-Orange (orange). I topped it with another coat of Seche Vite to smooth everything out. Thanks for looking!
 
 
PS - Don't forget to enter my giveaway to win a bottle of Nail-Venturous Floam! It's open until December 6th!


Wednesday, November 14, 2012

Nail-Venturous Floam Giveaway!!

Hello my lovely readers! I am super excited that today I going to host my very first giveaway - and what better product than this?! I purchased an extra bottle of Nail-Venturous Floam when I was lucky enough to find it in stock - and was saving it for this very occasion. I just had my One Year Blog-a-versary a few weeks ago, and wanted to thank my amazing readers and followers by doing a giveaway! The blog world is relatively new to me, and it's a learning curve! I apologize in advance if I don't do this perfectly, it's my first time having a giveaway, please be patient with me!


a Rafflecopter giveaway
One winner will be selected to receive one bottle of polish. Giveaway to United States residents only please. This promotion is in no way sponsored, endorsed or administered by anyone other than myself. Winner will be contacted by email after the giveaway ends. If the winner doesn't respond within 48 hours, another winner will be drawn. If you have any additional questions - feel free to send me an email or leave a comment below!

I am so excited to host this and I hope you all love it! Thanks for reading my blog, it's a labor of love and knowing you enjoy it makes all the hard work worth it! Hope you enjoy this little thank you.

Thanks again!

Saturday, November 10, 2012

China Glaze Wicked Collection

Hi everyone! Today I have my very first post of an entire collection, so be prepared for lots of photos! I am a little delayed on this post, as we have already passed Halloween, but I wanted to share it anyway. I wish I had the budget to review and swatch full collections all the time! Props to the girls that do this frequently, it's a lot more work than you would think! Today I have the China Glaze Wicked Collection for Halloween 2012.


This is two coats of Immortal. The first coat of this polish was shear, but it built up nicely with two coats. I don't think it's obvious in these photos, but the fine shimmery flecks in this polish had specks of pink, purple, blue and silver. I liked it more than I thought I would!


This is two coats of Roguish Red. I actually used this polish in one of my Halloween mani's here. I know I mentioned it in that post, but I'll say it again, the application on this polish was wonderful. You could easily get away with one coat. There were no streaks whatsoever. It's a nice red orange. Nothing spectacular with the color, but the application makes it worth the purchase!


This is two coats of Cast A Spell. This is an olive green polish with a golden flecks. Another good formula and it reminds me a bit of China Glaze Smoke and Ashes. I used it here.


This is two coats of Bizarre Blurple. This one had a decent formula, but I needed both coats on here. The color doesn't feel unique to me, but it's still a pretty shimmery blueish purple. I used this one here.


This is one coat of China Glaze Make A Spectacle over Immortal, and over Cast A Spell. I LOVE this glitter! It's packed with shimmer and these glitters that vary in color, it seems as though they show are orange, gold and blue. In the bottle, it looks a lot like China Glaze Snow Globe but on the nail it's nothing like it at all. I will do a comparison post on these two to show the difference.


This is one coat of Glitter Goblin over Roguish Red. I wasn't particularly impressed with this polish, the glitter applied evenly but it just wasn't very exciting to me. It is orange and silver holographic glitter.


This is both Glitter Goblin and Make a Spectacle over Zoya Raven. I like Glitter Goblin a bit better over black than I do over Roguish Red.
 
Over all I would say my favorites in this collection are Make a Spectacle and Immortal, although with the formula of Roguish Red it's one of my favorites as well. Thanks for reading!

Tuesday, November 6, 2012

Candy Corn Sponge Mani with Lush Lacquer Korny Candy

Hi there, today I have a candy corn mani that I just really didn't love, and really wouldn't photograph well! The below pictures are from my phone and my camera, I think I could get better pictures of the gradient with my phone on this one. It just all seemed to blend together in pictures, but it stood out so much better in person. One of the reasons why I was bummed with the final product is because I was cleaning up the sponging mess and cleaned too much, so bits of white show around the base of my nail. ugh!

 
To do this mani I started with one coat of Savvy French White White, and let it dry completely. Then I used a makeup sponge, and used the technique I used here by painting the yellow, orange and white on the flat end of the sponge and using it like a stamp, bouncing it up and down on my nail. The orange in this mani is China Glaze Orange You Hot? and the yellow is Ulta Sun-Sational.
 
 
After having this on for a few days, I got my Lush Lacquer package in the mail, and it contained Korny Candy, candy corn colored glitter! So I took a coat of it and put it on top. Lush Lacquer can be purchased at their Etsy shop. This is another cute polish, as you can see from my pinky it includes large hex glitters that seem a bit misplaced. Most of these had sunk to the bottom, but other than those random large white glitters, I really love this polish. 


Sunday, November 4, 2012

Lush Lacquer Hey Jack! and OPI Don't Touch My Tutu! Jelly Sandwich


Hi ladies! Have you heard about the new technique of using Elmer's Glue for glitter polish removal? I first heard about this technique from Wacky Laki, and was immediately excited! If you have ever worn glitter polish, I am sure you are familiar with the pain of removing it. Usually you end up with shreds of cotton balls stuck to your nails, or you have to soak your nails for a long time in acetone. I was actually recently talking to my friend Debby about the disastrous cotton ball mess of glitter removal, and she referred to it as cotton carnage! Lol! It's true though... the horrible removal usually stops me from wearing glitter.

Okay, back on topic... first I will tell you about what I am wearing, then I will tell you about the Elmer's Glue trick!


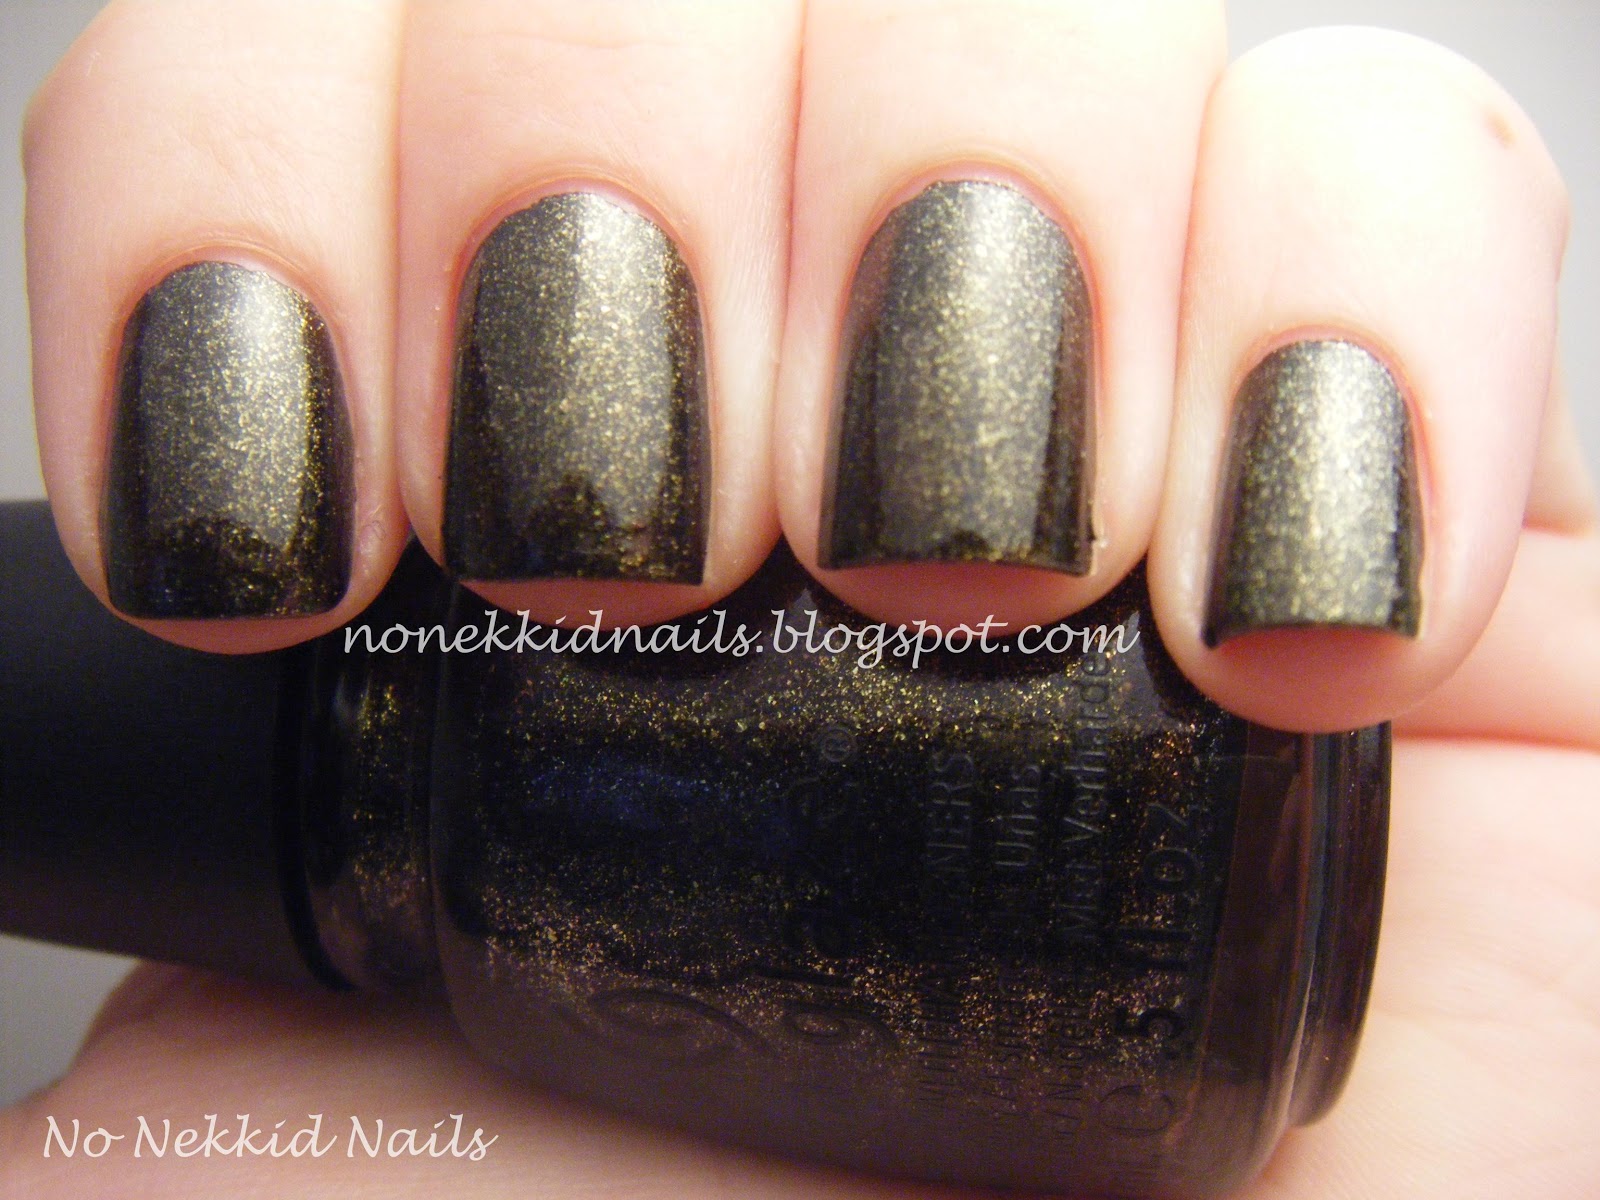
To do this mani I started with two very shear coats of OPI Don't Touch My Tutu! If I was wearing this on my own, I would absolutely need 3 or 4 coats, but since I was layering it I figured two would do the trick. This polish is a jelly from the New York City Ballet Collection.

 
Then I put on one coat of Lush Lacquer Hey Jack!, which is an indie brand of polish created by a mother/daughter team. You can purchase Lush Lacquer from their Etsy shop. I didn't have much trouble applying this polish, it was a bit on the thick side but that can be expected with glitter polish. I did have to push around the brush a bit to get a glitter placement I was happy with it overall - it's a fun Halloween themed glitter polish! This was my first purchase from Lush Lacquer, and I am quite pleased! Everything arrived safetly, and it took about 3 weeks for arrival (although their site clearly warns about that). I will certainly be a repeat customer.


I then followed the glitter with one coat of OPI Don't Touch My Tutu! and put a coat of Seche Vite on top to smooth everything out.
 
 
Okay, now to tell you about the Elmer's Glue trick. All I did was replace my normal base coat with a coat of Elmer's Glue. I cleaned out an empty bottle of Seche Vite with polish remover and poured my glue into the bottle. I put a coat of glue on my nails, and let it dry completely (about 5 minutes), and then continued to paint my nails like normal. I wore these nails for two days before I wanted to remove them, and all I had to do was lift an edge of the polish, and the polish peels right off without damaging your nail and best of all - no cotton carnage!

I didn't treat my nails any differently during this time, I still showered/washed my hands etc. and it didn't seem to make my nails chip. I did have one issue about 24 hours in, when I was out shopping and I could see my index finger getting loose, and it just jumped off! I was bummed out to be out with a nekkid nail... but I didn't seem to have any trouble with the other nails. Actually, when it was time for me to remove them, they still seemed pretty sturdy! Wacky Laki recommends using a cuticle pusher to help lift off your polish, but I was lazy and just sat on the couch while picking them by hand. It did the trick, but I am sure a cuticle pusher or something similar would work a bit better. If you give it a try, let me know if it works for you! Thanks for looking!

Saturday, November 3, 2012

Halloween Googly Eyes with China Glaze Near Dark and Bizarre Blurple

Hi there! Today I have a belated Halloween post. I got busy with school work the week or two before Halloween so I didn't get a chance to post a few of the designs I did before my skeletons. I will share those with you over the next few days. I saw today's idea on Pinterest... I feel a bit like a broken record with that statement! Maybe I should spend less time on there... but - I keep finding cute mani's! It's addicting!


To do this mani I used two coats of China Glaze Bizarre Blurple on my index, middle and pinky, and on my thumb and ring finger I used two coats of China Glaze Near Dark. Bizarre Blurple is a shimmery purple from the 2012 Wicked Collection, and Near Dark is a deep green from the 2011 Haunting Collection. I thought it would be appropriate to use my Halloween polishes for this!

Then I used a two ended dotting tool and placed two dots on each finger using OPI My Boyfriend Scales Walls. After that, I dotted on some glow in the dark Sally Girl polish. Those are the mini bottles they sell near the counter at Sally Beauty. I picked it up after my disappointing time with China Glaze Ghoulish Glow... it actually seemed to glow brighter and longer! It even showed up better in my picture below with just the tiniest dot of polish. I then took the smaller end of the dotting tool and used Orly Liquid Vinyl and dotted in various spots to give my guys little googly eyes! It was a lot of fun wearing this mani, especially when I was visiting my 1 year old niece and she spent the night inspecting the eyeballs and giggling! It was so precious! Anyway, thanks for looking!