Showing posts with label China Glaze. Show all posts

Thursday, February 28, 2013

China Glaze Real Nail Polish Appliques - Loop Hole

Today I have some China Glaze Real Nail Polish Appliques, and the name of this design is Loop Hole. I got these from my fiance for Christmas, and was surprised because I didn't even realize that China Glaze had nail appliques!


I found that these were pretty easy to use, and the instructions on the package were pretty easy to follow. They had a nice stretch to them when applying them to my nail. I feel like the fact that there was some give to them, helped them fit the shape of my nail and made them easier to apply.  I have only ever used one nail appliques once before, like 3 years ago, and they were the Sally Hansen kind... so I can't say that my memory is perfect on this but I don't remember the Sally Hansen decals being as easy to use as I found these to be. I think it only took me about 15 minutes to apply all of these. They recommend applying a top coat, and I added a coat of Seche Vite on top. However, as the days passed the top coat started to flake off of my nails (leaving the appliques fine underneath). These lasted about 5 or 6 days before I had a couple of chips on the end of them and I wore them for a full week. Removal wasn't too bad either, I just held the cotton ball on the nail for about 30 seconds or so and they came off much easier than trying to scrub and rub the nail the entire time. Thanks for looking!

Sunday, February 17, 2013

China Glaze Fuschia Fanatic and Shower Together Tape Dotticure


Hi everyone! Sorry I've been missing for so long! I have no good excuse, to be honest... just that I graduated in December and have been fully enjoying my freedom of not having anything that I MUST do when I get home from work. I suppose I've had a long enough break, and it's time for me to get back to my blogging!
 
I did this mani from an idea I saw on Pinterest, that was watermarked from The Nail Polish Project. I love these colors together, and it was a simple and fun design. 
 
 
To do this mani I started with two coats of China Glaze Shower Together on my thumb, index and middle finger and China Glaze Fuschia Fanatic on my ring finger and pinky. I put a coat of Seche Vite over everything and let it dry. Then I took a piece of scotch tape and cut it with craft scissors, and laid on my ring finger and thumb, and painted the free half of my nail with OPI My Boyfriend Scales Walls. Then I took a dotting tool and added dots of the opposite color over the white. Thanks for looking!
 
.


Friday, December 28, 2012

Winter Snowflake Mani with China Glaze Snow Globe

As I sit here starting to type up this post, it's starting to snow! It's so pretty! I have been seeing such beautiful snowflake mani's out lately, and I wanted to do one for myself!
 
 
To do this mani I started with two coats of OPI My Boyfriend Scales Walls, and one coat of China Glaze Snow Globe. I think that glitter is perfect for this type of wintry mani! I did a comparison post of Snow Globe and China Glaze Make a Spectacle where you can see it over black if you'd like.
 
 
Then I used a Bundle Monster Plate BM14, using the snowflake design 2 to 4 times on each nail, stamping with China Glaze Deviantly Daring. I wore this polish before, and mentioned that I thought it would be good for stamping. It didn't disappoint! I then put a coat of Seche Vite on top to seal it in. Thanks for looking!


Tuesday, December 4, 2012

Dupes? China Glaze Snow Globe & China Glaze Make a Spectacle

Hi there! Sorry this is a little delayed, but when I reviewed the China Glaze Wicked Collection, I mentioned wanting to do a comparison of China Glaze Make a Spectacle (Wicked Collection, Halloween 2012) and China Glaze Snow Globe (Let it Snow Holiday Collection, 2011) because they look so similar in the bottle, see below. On the left is Make a Spectacle, and on the right is Snow Globe.

 
The photos below are over two coats of Zoya Raven. On my index and middle finger is one coat of Make a Spectacle, and on my middle and pinky is one coat of Snow Globe. Both applied really evenly and easily, however putting them over black - you can see just how different they are! The colors in both of these really surprised me. Snow Globe is packed with blue, turquoise, silver, pink? I'm not even sure... but it is surprisingly colorful! Make a Spectacle has an olive-y feel to it. I love the way the glitters shifted from green to gold. It's really interesting to look at!


The below photos are over two coats of OPI My Boyfriend Scales Walls. Same as above, the glitters are one coat of each. On my index and ring finger is Make a Spectacle, and on my middle and pinky is Snow Globe. It's not as obvious how different these two are over white. They both have a really beautiful snowy look, and would be great in any wintry manis! Hope this was helpful, thanks for looking!


PS - Don't forget to enter my giveaway to win a bottle of Nail-Venturous Floam! It's open until December 6th!


Friday, November 23, 2012

Thanksgiving Dotticure

I know I'm a day late, but Happy Thanksgiving to those who celebrated it! Today I wanted to share my Thanksgiving mani. I just went with some Thanksgiving / fall colors.


To do this mani I started with two coats of China Glaze Desert Sun, with a coat of Seche Vite on top. This one is from the fall 2012 On Safari Collection by China Glaze. It applied really nicely, but I needed both coats. I really enjoy this color, it reminds me of a creamy caramel, yum!

 
After letting it dry a bit, I used a medium sized dotting tool and added dots of China Glaze Exotic Encounters (teal), Finger Paints Catwalk Queen (yellow) and Finger Paints Cordur-Orange (orange). I topped it with another coat of Seche Vite to smooth everything out. Thanks for looking!
 
 
PS - Don't forget to enter my giveaway to win a bottle of Nail-Venturous Floam! It's open until December 6th!


Saturday, November 10, 2012

China Glaze Wicked Collection

Hi everyone! Today I have my very first post of an entire collection, so be prepared for lots of photos! I am a little delayed on this post, as we have already passed Halloween, but I wanted to share it anyway. I wish I had the budget to review and swatch full collections all the time! Props to the girls that do this frequently, it's a lot more work than you would think! Today I have the China Glaze Wicked Collection for Halloween 2012.


This is two coats of Immortal. The first coat of this polish was shear, but it built up nicely with two coats. I don't think it's obvious in these photos, but the fine shimmery flecks in this polish had specks of pink, purple, blue and silver. I liked it more than I thought I would!


This is two coats of Roguish Red. I actually used this polish in one of my Halloween mani's here. I know I mentioned it in that post, but I'll say it again, the application on this polish was wonderful. You could easily get away with one coat. There were no streaks whatsoever. It's a nice red orange. Nothing spectacular with the color, but the application makes it worth the purchase!


This is two coats of 
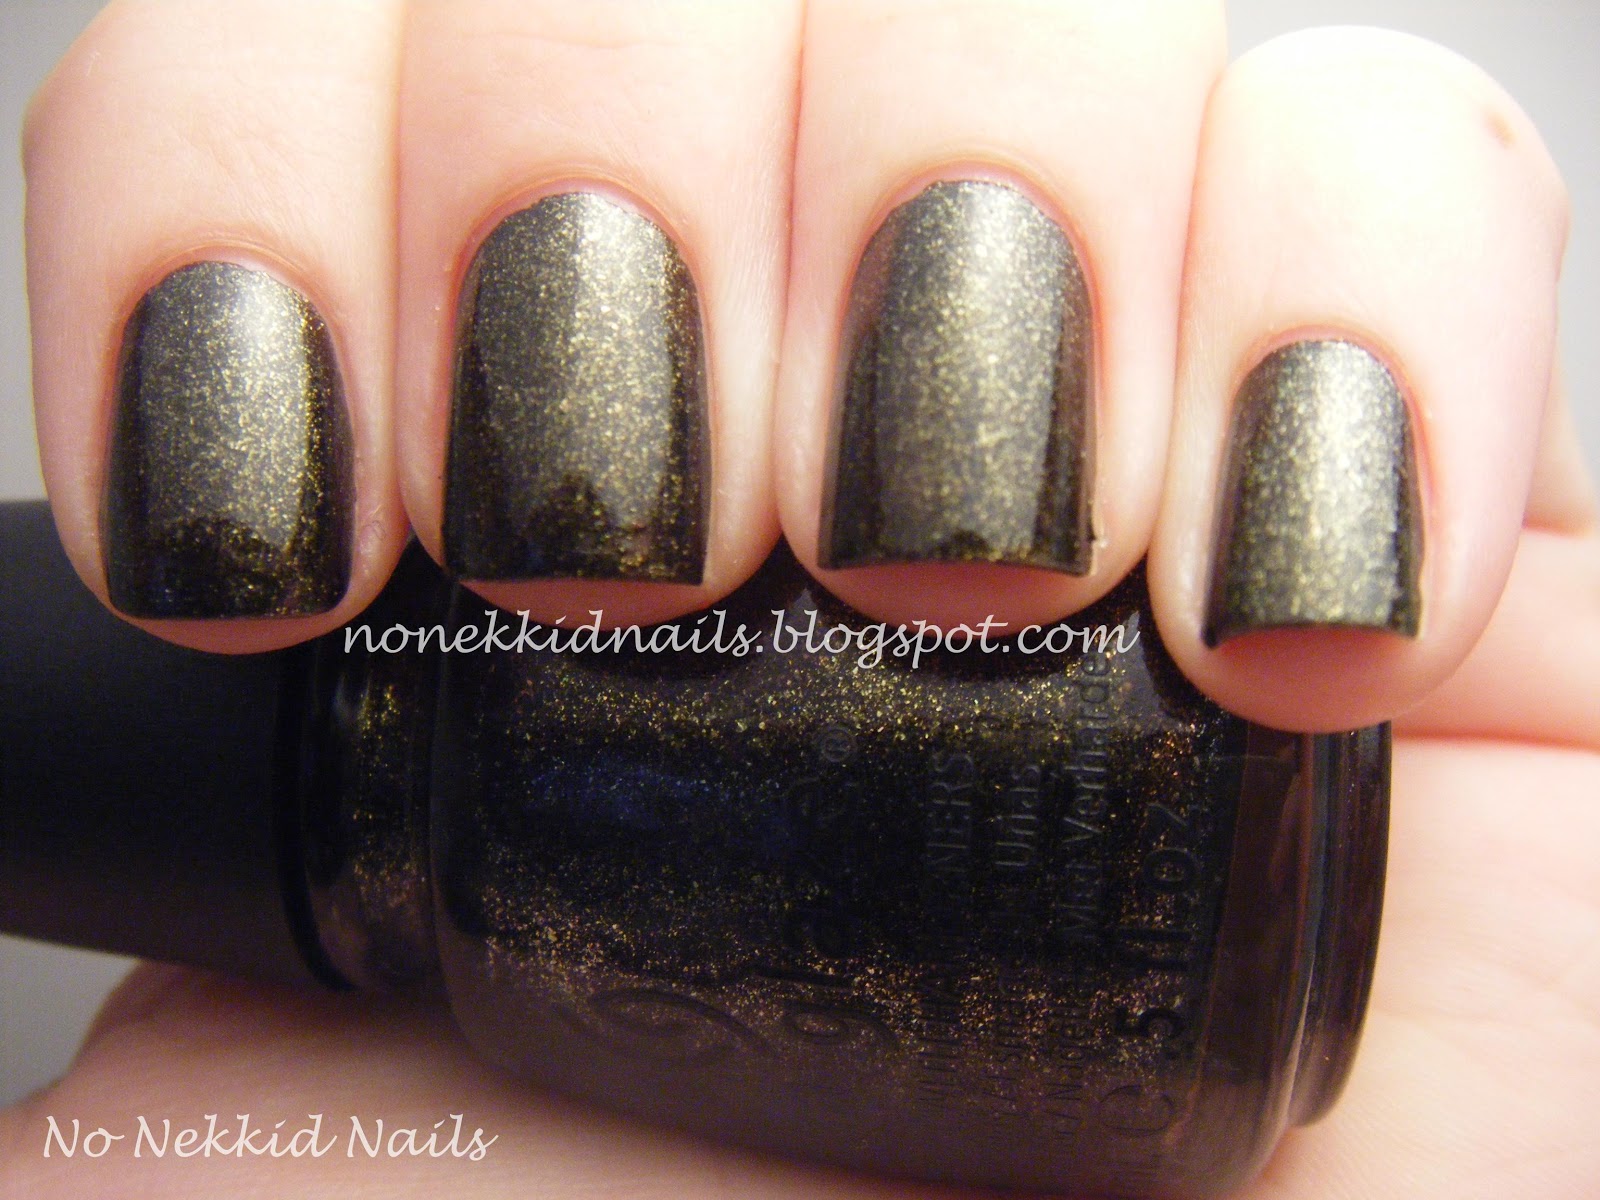
Cast A Spell. This is an olive green polish with a golden flecks. Another good formula and it reminds me a bit of China Glaze Smoke and Ashes. I used it here.


This is two coats of Bizarre Blurple. This one had a decent formula, but I needed both coats on here. The color doesn't feel unique to me, but it's still a pretty shimmery blueish purple. I used this one here.


This is one coat of China Glaze Make A Spectacle over Immortal, and over Cast A Spell. I LOVE this glitter! It's packed with shimmer and these glitters that vary in color, it seems as though they show are orange, gold and blue. In the bottle, it looks a lot like China Glaze Snow Globe but on the nail it's nothing like it at all. I will do a comparison post on these two to show the difference.


This is one coat of Glitter Goblin over Roguish Red. I wasn't particularly impressed with this polish, the glitter applied evenly but it just wasn't very exciting to me. It is orange and silver holographic glitter.


This is both Glitter Goblin and Make a Spectacle over Zoya Raven. I like Glitter Goblin a bit better over black than I do over Roguish Red.
 
Over all I would say my favorites in this collection are Make a Spectacle and Immortal, although with the formula of Roguish Red it's one of my favorites as well. Thanks for reading!

Tuesday, November 6, 2012

Candy Corn Sponge Mani with Lush Lacquer Korny Candy

Hi there, today I have a candy corn mani that I just really didn't love, and really wouldn't photograph well! The below pictures are from my phone and my camera, I think I could get better pictures of the gradient with my phone on this one. It just all seemed to blend together in pictures, but it stood out so much better in person. One of the reasons why I was bummed with the final product is because I was cleaning up the sponging mess and cleaned too much, so bits of white show around the base of my nail. ugh!

 
To do this mani I started with one coat of Savvy French White White, and let it dry completely. Then I used a makeup sponge, and used the technique I used here by painting the yellow, orange and white on the flat end of the sponge and using it like a stamp, bouncing it up and down on my nail. The orange in this mani is China Glaze Orange You Hot? and the yellow is Ulta Sun-Sational.
 
 
After having this on for a few days, I got my Lush Lacquer package in the mail, and it contained Korny Candy, candy corn colored glitter! So I took a coat of it and put it on top. Lush Lacquer can be purchased at their Etsy shop. This is another cute polish, as you can see from my pinky it includes large hex glitters that seem a bit misplaced. Most of these had sunk to the bottom, but other than those random large white glitters, I really love this polish. 


Saturday, November 3, 2012

Halloween Googly Eyes with China Glaze Near Dark and Bizarre Blurple

Hi there! Today I have a belated Halloween post. I got busy with school work the week or two before Halloween so I didn't get a chance to post a few of the designs I did before my skeletons. I will share those with you over the next few days. I saw today's idea on Pinterest... I feel a bit like a broken record with that statement! Maybe I should spend less time on there... but - I keep finding cute mani's! It's addicting!


To do this mani I used two coats of China Glaze Bizarre Blurple on my index, middle and pinky, and on my thumb and ring finger I used two coats of China Glaze Near Dark. Bizarre Blurple is a shimmery purple from the 2012 Wicked Collection, and Near Dark is a deep green from the 2011 Haunting Collection. I thought it would be appropriate to use my Halloween polishes for this!

Then I used a two ended dotting tool and placed two dots on each finger using OPI My Boyfriend Scales Walls. After that, I dotted on some glow in the dark Sally Girl polish. Those are the mini bottles they sell near the counter at Sally Beauty. I picked it up after my disappointing time with China Glaze Ghoulish Glow... it actually seemed to glow brighter and longer! It even showed up better in my picture below with just the tiniest dot of polish. I then took the smaller end of the dotting tool and used Orly Liquid Vinyl and dotted in various spots to give my guys little googly eyes! It was a lot of fun wearing this mani, especially when I was visiting my 1 year old niece and she spent the night inspecting the eyeballs and giggling! It was so precious! Anyway, thanks for looking!


Monday, October 22, 2012

Green Halloween Stitches

I've got another Halloween design for you today! I saw this idea on Pinterest and it seemed like a pretty simple and fun mani to try out. Plus, I got to use lots of green which is always a plus for me! It reminds me of Frankenstein or Nightmare Before Christmas.


To do this mani I first painted my index and ring finger with two coats of China Glaze Electric Pineapple, and my thumb, middle and pink with two coats of OPI Stranger Tides. Then I painted alternating sections of each of the nails with China Glaze In The Lime Light. I didn't use tape to line these up because I was painting black lines to disguise the uneven paint job. Before painting the black lines I put on a coat of China Glaze Ghoulish Glow, their glow-in-the-dark polish. I was hoping it would look really cool, but it barely showed up.... see below *sigh*. The bottle was glowing like crazy, but I could hardly get it to show up on my nails. It may have worked better with several coats? I'm not sure, but I was rather bummed about it.


I used a Finger Paints nail art striper in Ch-Art-Coal Black to draw on the black stiches, then I topped everything with a coat of Seche Vite. Thanks for looking!


Saturday, October 20, 2012

China Glaze Cast a Spell and Roguish Red Halloween Stamp

It's time to start some Halloween mani's! I think these are my favorite themed designs to do, there are so many fun designs out there to try and I just can't get enough! I went to Sally's last week and had only intended on getting a few of the new China Glaze Wicked Collection, but I caved and got them ALL. Woops! I couldn't resist - they had a 4-pack including their glow in the dark polish, Ghoulish Glow, for $9.99. It felt like a steal!


I used two of the polishes from the collection for this mani, China Glaze Roguish Red and China Glaze Cast A Spell. The formula on both of these was outstanding. Seriously. I used two coats of each but it was out of habit rather than necessity. I was especially surprised with Roguish Red because I would have expected it to be more shear or streaky but it went on so smooth and it was so opaque! I love it. Cast A Spell reminded me a lot of China Glaze Smoke and Ashes, except it has an olive/gold shimmer instead of the multi-colored shimmer in Smoke and Ashes. I just love both of these colors and can't wait to try out the rest of the collection.


The stamp on this mani is Konad Special Polish in Black, and Bundle Monster Plate BM13. The web and the spider are two different stamps, and the bat stamp is actually the top two bats, and I felt like I needed a third so I repeated one of the bats to make it fill my nail. I loved wearing this design and I love these colors! Thanks for looking!


Thursday, October 18, 2012

China Glaze Go Go Pink Stamp Mani

Hello there! Today I have a mani for you that I did for my engagement pictures! My wonderful cousin took some save the date and engagement pictures for my fiance and I last weekend and I had several different outfits so I wanted to give myself a subtle mani that would look nice with all the different outfits. This is what I came up with!

 
To do this mani I started with three coats of China Glaze Go Go Pink, with a coat of Seche Vite on top to help it dry faster. I was not impressed with the application on this polish. I don't think you could get away with less than three coats on this one. It was very thin and streaky, and I don't feel like it is unique enough to put up with such a bad formula. It's a beautiful color, but not worth the trouble. If I hadn't been planning to stamp over it, I may have added another coat to try and even out all of the streaks.
 
 
To stamp this design I used Konad Special Polish in White, and Konad Plate M64. I had some smudging on my thumb but the rest of the mani turned out nicely. I topped it with a coat of Seche Vite. Thanks for looking!